 |
||||
The rubber stamping technique is so easy to learn you will become an instant artist. You can learn the basic techniques in just a few minutes. If you've never stamped before you will be amazed at what you can make. Your scrapbooking will go to the next level. |
||||
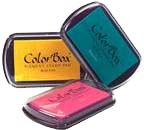
The most common colorants for stamps are ink pads and brush markers. Before you ink your stamp be sure it is clean and dry. When coloring with ink, gently tap the stamp onto the pad. Please don't rub or grind the stamp on the pad or apply excessive pressure.
Some available stamp pads have removable sections so that you can color individual parts of the image with different colors.
Hold the stamp at an angle to see if it is evenly colored. If you do accidentally ink the rubber surrounding the image just remove it with a cotton swab.
You are now ready to stamp. Carefully position your stamp over the paper in the area you wish to stamp. Press the inked stamp straight down onto the paper with out rocking or wiggling. Once you have done this, lift the stamp straight up.
With this rubber stamp technique you now have the design on your paper. It is best if you try it on scrap paper before you put it on your permanent page. You may want to try different colors, so it is best if you put it on scrap paper.
The pressure required depends on the size of the stamp and the amount of detail. If the image is blurry, you may be applying too much pressure or else you are rocking the stamp. When pressing large stamps, place the palm of one hand on the top of the stamp. Lay your other hand on top of the first hand and press straight down.
 After you are through with the stamp, clean it right away. This will make your future projects easier and also protect your investment.
You can remove most of the ink by using paper towels moistened with water or a mild cleanser. Be sure the cleanser is ammonia free and bleach free. I also like to use baby wipes that are alcohol free. Most towelettes work great too.
After you are through with the stamp, clean it right away. This will make your future projects easier and also protect your investment.
You can remove most of the ink by using paper towels moistened with water or a mild cleanser. Be sure the cleanser is ammonia free and bleach free. I also like to use baby wipes that are alcohol free. Most towelettes work great too.
If you have ink that may be stuck in the crevices, a toothbrush works great. Be sure to dry the stamp by blotting on a paper towel or soft cloth. Store your stamps in a cool location with the rubber side down. Never stack your rubber stamps.
I hope my rubber stamping technique has helped you.
If you have any questions or arts and crafts ideas please contact me and I will add it to my site.
Scrapbook.com: Thousands of scrapbooking supplies. HUGE daily discounts!

Return from Rubber Stamping to Paper Crafts

![]()
Craft Ideas
I'd love to hear from you. If you have any questions or arts and craft tips that you would like to share please contact me and I will share them with everyone else.
Blick Art Materials-You can find all kinds of art and craft supplies here that you can't find anywhere else.


Purchase scrapbooking supplies from the Scrapbook.com Superstore!
MisterArt.com Discount Art & Craft Supplies--Up to 75% off!
MisterArt.com offers a huge selection of discount art supplies and craft supplies
Create More, Spend Less at www.CreateForLess.com
Copyright 2007.
Return to top