 |
|||||
You can make a beaded bookmark with these simple instructions. They make great gifts and people love them. I use to use paper to make my place and I even use to bend the page (which you are not suppose to do). Now I use beautiful bookmarks to save my place. |
|||||
I found that this site offers a huge selection of exceptional beads at low prices. Plus,they offer free shipping!
There are so many beautiful beads on the market that your hardest part to make a beaded bookmark will be selecting beads. You can choose from seed beads or some really pretty bigger beads
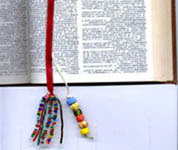
The picture below shows 2 different designs. One is made with seed beads and the other one is made with bigger beads.
Supplies You Will Need For A Seed Bead Bookmark.
- Your choice of color of seed beads. I used #6 beads for the main colors and #11 for the bottom white beads.
- You will also need a regular bead for the top of your bookmark
- Beading needle and beading thread.
Instructions to make a beaded bookmark with seed beads.
 1. Tie a knot on one end of your ribbon. Trim the ribbon end close to the knot. Thread the beading needle and go through the ribbon knot to secure the end of the thread. String on as many large seed beads as you want the length to be. I used 21 large beads on mine. Now place 4 smaller seed beads and take your needle back through the larger beads. The small beads will form a loop at the end. Run your needle back through the ribbon knot. Repeat with another string of beads. You can add as many strings as you would like. When you have as many strings as you want secure the end of the thread in the knot. I also used bugle beads in my bookmark.
2. On the other end of your ribbon tie a knot about 2 inches from the end. Add a large regular bead and then make another knot to secure the bead. Trim the end of the ribbon and you now have a bookmark.
Supplies you will need for the regular bookmark
- You can use string, nylon cord, embrodiery floss
- Beads of your choice
Instructions for the regular bead bookmark
 1. Cut your cord as long as you need. Measure your book and then add about 4 to 5 inches.
2. Tie a not in the end of your cord and add your beads. You can use different shapes and colors to make it interesting. I usually add around six. After you have the beads on make another knot on top of the beads to keep them in place.
3. On the top of your beaded bookmark make another knot about 1 ½ inches from the top. You can add another bead or use your imagnitation and use whatever you want on the top. Make another knot after your bead and trim the ends. You now have a beaded bookmark that you made yourself.
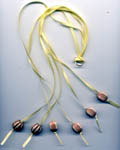
4. The bookmark pictured here was made with three pieces of ribbon folded in half and hooked at the top with a simple ring. The neat thing about this bookmark is that you can save 6 different places in your book. It is especially great for your Bible.
If you have any questions or any arts and crafts ideas please contact me and I will add it to my site.
Craft Ideas
I'd love to hear from you. If you have any questions or arts and craft tips that you would like to share please contact me and I will share them with everyone else.
Blick Art Materials-You can find all kinds of art and craft supplies here that you can't find anywhere else.
Purchase scrapbooking supplies from the Scrapbook.com Superstore!
MisterArt.com Discount Art & Craft Supplies--Up to 75% off!
MisterArt.com offers a huge selection of discount art supplies and craft supplies
Create More, Spend Less at www.CreateForLess.com
Copyright 2007.
Return to top
